Our tips  

To lace running shoes properly


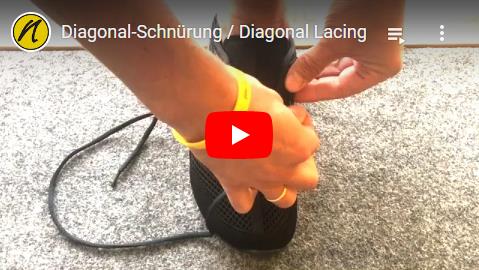
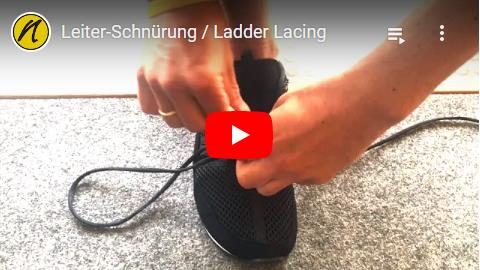
A running shoe should be well adapted to the foot, with different lacing techniques you can adapt the shoe to your foot. Here you will learn 4 different lacing techniques.
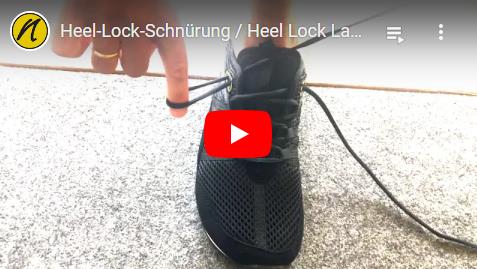
Heel lock lacing 

Heel lock laced shoe for runners whose heels slip from the base of their running shoes.

  • Start at the top-most eyelet and pull laces through so that they’re of even length.
  • Lace your shoe in the traditional cross-over method, stopping with two eyelets remaining.
  • Run the left lace on the outside of the shoe to the last available eyelet.
  • Push the lace through the eyelet from inside.
  • Tuck the left lace into the remaining unused eyelet to create a loop.
  • Run the right lace on the outside of the shoe to the last available eyelet.
  • Push the lace through the eyelet from inside.
  • Tuck the right lace into the remaining unused eyelet create a loop.
  • Run the ends of the laces throught the small loops on each opposite side.

When you tie your shoes as normal, the loop you created will gently secure your heel to your running shoe, improving your heel fit.

Running shoe lacing technique for top-of-foot pain

For runners with high arches, try the Ladder Method of lacing.

  • Start at the top-most eyelet and pull laces through so that they’re of even length.
  • Run the left lace on the inside of the shoe to the first available eyelet.
  • Push the lace through the eyelet and pull straight across.
  • Run the right lace on the inside of the shoe to the next available eyelet.
  • Push the lace through the eyelet and pull straight across.

Repeat until shoe lacing is complete.

Running shoe lacing technique for top-of-foot pain

For runners with high arches, try the Ladder Method of lacing.
  • Start at the top-most eyelet and pull laces through so that they’re of even length.
  • Run the left lace on the inside of the shoe to the first available eyelet.
  • Push the lace through the eyelet and pull straight across.
  • Run the right lace on the inside of the shoe to the next available eyelet.
  • Push the lace through the eyelet and pull straight across.
Repeat until shoe lacing is complete.

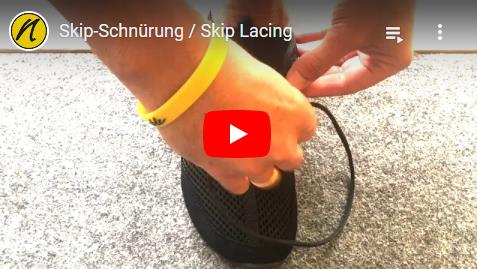
Skip lacing for runners with wide feet 

The Skip Lacing Method relieves pressure from a specific area of your foot.

  • Start at the top-most eyelet and pull laces through so that they’re of even length.
  • Lace your shoe in the traditional cross-over method, stopping at the eyelet where the point of pain begins.
  • Run the left lace on the inside of the shoe, skipping to the first eyelet past the point of pain.
  • Push the lace through the eyelet and pull straight across.
  • Run the right lace on the inside of the shoe, skipping to the first eyelet past the point of pain.
  • Push the lace through the eyelet and pull straight across.
  • Finish lacing your running show in the traditional cross-over method.

Diagonal lacing for runners with jammed-up toes

Diagonal laced shoe for runners whose toes get banged up and sometimes turn black-and-blue.

  • Start at the bottom-most eyelet and thread lace unevenly so that one lace has enough slack to tie.
  • Run the longer lace diagonally to the top-most eyelet on the opposite side of the shoe. Pull the longer lace through the eyelet.
  • Pull the longer lace through the eyelet.
  • Run the longer lace across to the opposite eyelet.
  • Push the longer lace through the eyelet.
  • Run the longer lace diagonally to the opposite side of the shoe, beneath the "diagonal" lace already in place.
  • Repeat steps 4-6 until reaching the last eyelet.

When you tie your shoes as normal, you will feel the extra room created in the toe box of your shoe.

Diagonal lacing for runners with jammed-up toes

Diagonal laced shoe for runners whose toes get banged up and sometimes turn black-and-blue.

  • Start at the bottom-most eyelet and thread lace unevenly so that one lace has enough slack to tie.
  • Run the longer lace diagonally to the top-most eyelet on the opposite side of the shoe.
  • Pull the longer lace through the eyelet.
  • Run the longer lace across to the opposite eyelet.
  • Push the longer lace through the eyelet.
  • Run the longer lace diagonally to the opposite side of the shoe, beneath the "diagonal" lace already in place.
  • Repeat steps 4-6 until reaching the last eyelet.

When you tie your shoes as normal, you will feel the extra room created in the toe box of your shoe.